


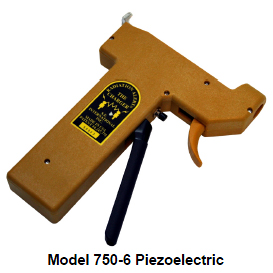
Ideal for using in “Field” operations
This hand-held Dosimeter Charger can zero a variety of quartz or carbon fiber dosimeters by simply squeezing the lever of the Piezoelectric Generator. The Model 750-6 Charger requires absolutely no batteries...ever! By pulling the trigger, a dosimeter is easily placed in or removed from the Charger. The positive clamping action securely holds the dosimeter while charging and is easily release by merely squeezing the trigger.
Specifications

| Power | 15,000 volt Piezoelectric Generator |
|---|---|
| Discharge Bulb | Regulates voltage to 250 volts and provides flash to indicate the instrument is operational |
| Charging Contact | Gold-Plated Brass Clamping |
| Mechanism |
Adjustable and self-locking Spring-Loaded ? Applies 10 lbs. of pressure All metal parts are stainless steel to prevent rusting |
| Humidity | 0 to 90% Relative Humidity |
| Weight | 245.1 Grams (8.64 oz) |
| Size | 152.4 x 107.95 x 22.2 mm |
| Warranty | One-Year Limited Warranty |
Basic Operation
The Radiation Alert Charger (fig 1) is used to zero a variety of quartz or carbon fiber dosimeters. The
charger controls the movement of the hairline fiber inside the dosimeter. When the fiber is on zero, the
dosimeter is fully charged (zeroed). It is powered by a piezoelectric generator. The charger requires
absolutely no batteries.
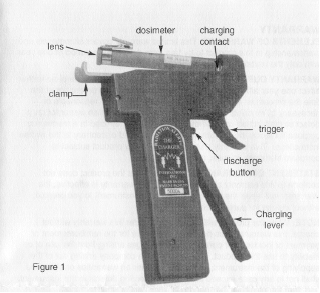
To charge a dosimeter you
simply squeeze the lever a
few times. If the fiber passes
zero and is still visible, a
discharge button allows the
operator to discharge the
dosimeter and set it exactly
on zero. The clamp is
adjustable and self-locking
and automatically holds the
dosimeter for you. By
squeezing the trigger, you
can easily position a
dosimeter a dosimeter into or
remove it from the charger.
Charging the Dosimeter
1. Hold the charger upright as shown in figure 1. Lift the clamp and pull it back to the approximate length
of the dosimeter. Place the dosimeter in the clamp with the recessed end (opposite the lens) over the
charging contact. This allows for the electrical contact between the dosimeter and the charger.
2. While squeezing the trigger, push the clamp against the lens end of the dosimeter and release the
trigger. Important: If the clamp is not pushed against the lens end of the dosimeter before releasing the
trigger, electrical contact may not be adequate to charge the dosimeter. Do not push too hard. You may
damage the dosimeter.
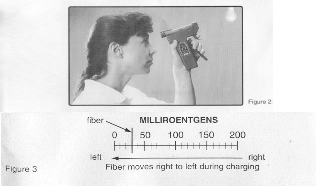
3. Check that the position of the dosimeter provides a good view of the scale through the lens. Refer to figure 2.
4. With the dosimeter locked in-place, look through the dosimeter at a light source such as a light bulb, window or a small flashlight to view the scale shown in figure 3.
5. Squeeze and release the charging lever until you see the fiber appear on the scale. The fiber appears from the right of the scale and moves towards zero. Once you see the fiber, partial squeezes of the charging lever will be enough to control its movement. If the dosimeter is not responding, repeat Step 2. If the fiber has traveled to the left of zero but is still visible, push the discharge button until the fiber is on zero. If the fiber is not visible, repeat Step 5.
6. To remove the dosimeter, squeeze the trigger, lift the dosimeter to just above the end of the clamp. Pull dosimeter straight back to disengage it from the charging contact. If your dosimeters are all the same length, you should not have to adjust the clamp as described in Steps 1 and 2. The length setting of the clamp will not change unless the clamp is manually adjusted.