


The patented “kick” feature found on the DCA Model 909 Charger automatically removes residual static charge from the dosimeter’s charging pin every time the dosimeter is rezeroed. This eliminates a major source of erroneous fiber movement (up to 5% of full scale)
Model 909
Battery-Powered Dosimeter Charger
Easier charging, viewing, dosimeter protection and improved accuracy… these are the biggest reasons that the DCA Model 909 Dosimeter Charger is the best value on the market today! The Model 909 Charger reading light reduces re-zeroing time and effort by eliminating the need to remove the dosimeter from the charger for reading. Simply view the scale while the dosimeter is resting lightly on the charger contact after re-zeroing. Reading in the same orientation as charging also minimizes the effect that gravitational induced fiber movement has on dosimeter accuracy and precision.
The Model 909 Charger charging contact is spring-loaded and has a positive mechanical stop. This design feature makes it virtually impossible to damage dosimeters through excessive charging force.
Specifications
| Weight | 10.6 oz.( 302 g) |
|---|---|
| Width | 4” (102 mm) |
| Length | 4” (102 mm) |
| Height | 3.5” (89 mm) |
| Case | ABS Plastic |
| Controls | One turn potentiometer Reading; spring-loaded push rod |
| Power - Battery | 1.5 V “D” cell |
| Charging voltage | 40 V to 220 V |
| Operating Temperature | 0 ? 120 F (-18 ? 49 C) |
| Lamp | Model 222 |
| (TL-3 Miniature screw) |

Accumulated radiation is read directly on an internal calibrated scale of the dosimeter. A Dosimeter Charger is required in order to return the dosimeter to zero after each exposure period if desired. One end of the dosimeter contains an optical eye-piece, the opposite end is sealed by a diaphragm switch which houses the insulated steel charging pin. The instrument is charged (set to zero) by pressing the charging pin onto the charging socket on the charger. Arrow-Tech Model 138 dosimeter shown When the charging end of the dosimeter is pressed firmly into the charging contact (pedestal) on the charger, the pin contacts the electrometer frame. Sufficient voltage is applied to charge the dosimeter and to set the fiber to zero. Step 1: To read a dosimeter, simply remove the cap on the charging contact. Place the dosimeter on the charging pedestal and press the “Push Rod” to activate the light. If the light does not come on, it could mean there is no battery inside the charger. Installed the battery by removing the screw on the bottom of the charger and install a new battery. Note: The + end of the battery needs to be aligned with the + (pos) marking on the circuit board inside the charger.

Step 2: While pressing the charging end of the dosimeter firmly down in the receptacle of the charger, adjust the "Zeroing Knob" on the Charger. While looking through the dosimeter at the light that comes, adjust until a zero reading is indicated. If the fiber is not moving, press the dosimeter farther down in the receptacle and try again.
Step 3: At times, a transient "kick" is experienced when zeroing the dosimeter. The charging contact of the charger automatically
compensates for the kick when the dosimeter is with drawn slowly from the contact. You can see this effect by holding the dosimeter
on the charging contact while looking into the instrument. Withdraw the instrument slowly. You will note that just before the light
turns off, the hairline will shift. With a little practice the hairline can be made to shift so that its final position coincides with the zero
line. Optimum performance is obtained when electrostatic kick is compensated for in this manner. The hairline will remain on or near
the zero position for long periods when not exposed to radiation.
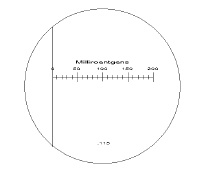
Step 4: When resetting the dosimeter to zero, the fiber may disappear and remain hidden. To release the fiber, slowly turn the "Zeroing Knob" knob until the fiber reappears.
Keep repeating steps 1 through 4 as needed. Some practice might be required to become proficient at zeroing the dosimeter.
Your dosimeter should now be on zero (0) and ready for use Note: When properly zeroed the dosimeter will remain on zero